Blogroll

Showing posts with label “Your client does not support opening this list with Windows Explorer. Show all posts

Wednesday, September 4, 2013

Copy/Move a document between Web Applications + Site Collections + subsites - SharePoint 2010

Lists and Libraries are being extensively used in SharePoint as it’s a collaboration product. Common functionalities that we do on regular basis includes create document libraries and lists, uploading documents, create items, manage permissions at the library level / list level / Item level , manage versions and so many things…

Today’s article is based on the same as how to transfer/copy/move items between web applications/site collections/subsites.
Note: Make sure this feature ‘SharePoint Server Publishing Infrastructure’ should be activated before applying the following steps.
How to check this:
<!--[if !supportLists]-->1)   <!--[endif]-->Open the site
<!--[if !supportLists]-->2)   <!--[endif]-->Site actions
<!--[if !supportLists]-->3)   <!--[endif]-->Site settings
<!--[if !supportLists]-->4)   <!--[endif]-->Site collection administration
<!--[if !supportLists]-->5)   <!--[endif]-->Site collection features
<!--[if !supportLists]-->6)   <!--[endif]-->Activate this feature ‘SharePoint Server Publishing Infrastructure’

Note: If you can’t see the site collection administration then it’s because of permissions, you should be listed as ‘site collection administrator’ to view that option. If you don’t have rights then please contact the assigned site collection administrators to activate that feature.
Coming back to the main article where we are going to see the actual process:
Would like to explain this by means of example:
Suppose there are two sites: site A and site B
Site A: Root site and site B: subsite
<!--[if !supportLists]-->1)   <!--[endif]-->Open the site A
<!--[if !supportLists]-->2)   <!--[endif]-->Site actions
<!--[if !supportLists]-->3)   <!--[endif]-->Site settings
<!--[if !supportLists]-->4)   <!--[endif]-->Site administration
<!--[if !supportLists]-->5)   <!--[endif]-->Content and structure
<!--[if !supportLists]-->6)   <!--[endif]-->Select the list or document library from the left hand side- click on it.
<!--[if !supportLists]-->7)   <!--[endif]-->Associated items will be reflected in the right hand side pane.
<!--[if !supportLists]-->8)   <!--[endif]-->Actions
<!--[if !supportLists]-->9)   <!--[endif]-->You will get the options as Move, copy and delete.

As soon as you will click on copy/move, you will get another dialogue box to select the destination site/ site B + library/list.
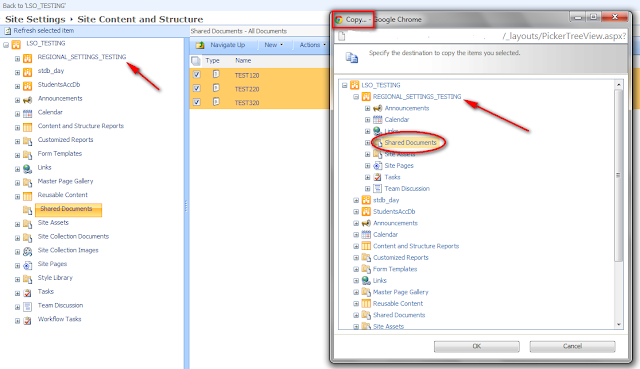

Select it and click OK

Items will be successfully moved to destination house.
Note: If you have any confusion regarding this process then I would request you to select the COPY option as it will not completely rid-off the source library items and only replicate it to the destination library. Once items will be successfully moved then you can delete the source library/list as per your requirements.

If you have any queries/questions regarding the above mentioned information then please let me know, Thank you.

Tuesday, February 19, 2013

Your client does not support opening this list with windows explorer windows 2008

Error message
“Your client does not support opening this list with Windows Explorer" when you try to "Open with Explorer" on a SharePoint document library
Troubleshooting:
-          Treid to open in Windows  XP. Works fine.
-          Treid to open in Windows Server 2003, gives error messsage.
-          Treid to open in Windows Server 2008, gives above error message.
-          Removed the ‘s’ from the http protocol.
-          Supplied the correct user name and password.
-          Started the ‘webclient’ service and installed desktop support expirence as a features in Windows server 2008. Still does’t work.
Resolution:
Add https://*.sharepoint.com to Local intranet site
To configure Web browser, open “Internet Options” menu, navigate to the “Security Tab”, and add https://*.sharepoint.com to Local intranet site.

Steps Featuring artcile:
Applied to:
-          Windows Server 2008
-          SharePoint Server 2010.

Wednesday, February 13, 2013

Failed to open a connection to the Nintex Workflow configuration database


Here we go with another new issue and easy resolutions & workarounds…
This time, the issue was with Nintex workflows at the time of activating a site collection feature. Let me describe the details in step by step so that it will be easy recognize as well as understand…

Problem Description:
Problem activating Site Feature. While activating the ‘Nintex workflow 2010’ at the site collection level, we faced the following error message:

Error Message:
An unexpected error has occurred.
Troubleshoot issues with Microsoft SharePoint Foundation.
Correlation ID: XXXXX

Troubleshooting Steps:
1)    Most imp regarding any exceptions: SharePoint logs (\14\logs)-specifically if we face “unexpected error”
2)    Windows event logs
3)    If we have a correlation id then it’s very easy to find out the exact error message

After reviewing the SP logs, this is what I found:
Exception was thrown while ensuring dependencies met for feature 'NintexWorkflow' (id: 0561d315-d5db-4736-929e-26da142812c5): Nintex.Workflow.NWFeatureActivatingException: Nintex.Workflow.NW2007DatabaseConnectionException: Failed to open a connection to the Nintex Workflow configuration database. ---> System.Data.SqlClient.SqlException: Cannot open database "NW2007WFDB" requested by the login. The login failed.  Login failed for user 'Contoso\Administrator'. 

What we need to target first in such conditions:
1.    What exactly the app pool identity is used by that web application? Does it have sufficient rights/not?
2.    The Nintex database has a role called WSS_Content_Application_Pools. This is the group that we need to add the app pool identity to
·         SQL SERVER
·         SharePoint_Config
·         Security
·         Users
·         The account which is running the app pool of the web application
·         Right Click-Properties
·         General
·         Database role membership

Resolution:
I have added this group named as WSS_Content_Application_Pools to the APP POOL identity and that it. It worked and issue has been successfully resolved…

If you have any queries/questions regarding the above mentioned information then please let me know.

I would be more than happy to help you as well as resolves your issues…

Thank you.

ShareThis

snow flakes

blogger widgets Blogspot Tutorial

LinkWithin

Related Posts Plugin for WordPress, Blogger...